Tuesday, September 13, 2011

RPA Preorder: S.H. Monster Arts Godzilla

S.H. MONSTER ARTS ゴジラ (Godzilla)
Release: November 2011 – Price: 5,775 Yen
Bandai


If I'm not mistaken, only the first issue of this figure will het these effect parts.

Monday, September 12, 2011

Bandai Mecha Godzilla small Japanese Vinyl


I figured since I took out the Mecha Godzilla vinyl for the Mecha Gorilla post, I would just show you guys the figure. It is nicely done and very detailed. They can be found somewhat cheap, so if you like it, give it a whirl. I paid about 800 Yen.
For a small vinyl, it is highly detailed.


Thursday, September 8, 2011

Raymundo Mecha Gorilla (Mechani-Kong) - Open Mouth Silver Version & Bomb Belt Silver Version

Who doesn't like a Mecha version of anything? There's Mecha Godzilla, Mecha Gomora and probably a couple of others. Today I have 2 Mecha Gorillas by Raymundo. They are vinyl figures of a you guess it, mechanized Gorilla. More specifically Mechani-Kong from "Godzilla Escapes". Apparently they do not have the license to use that name. I bought these because they were on clearance and looked pretty cool. I had seen them before at their regular price of $59.99 but I didn't like it enough to bite. That's some big dough for a modern vinyl. However, at $16 and $17, it was a little more acceptable. I mean, two big Mecha Gorilla vinyls for just over $30? Why not. Well, I got them today and boy am I glad I held off for clearance pricing. These things are smaller than I expected, I was dreaming of 9" tall Mecha Gorillas.  Smaller than Bandai vinyls which are much cheaper. Apparently, Raymundo does not manufacture these in the quantities that Bandai can,  so the original price reflects that. Even at clearance they are more expensive than Bandai vinyl.

Anyways, on with the figures. Here is the first of the lot, the Open Mouth Silver Version.


Here is the Bomb Belt Silver Version.


Size comparison with a Bandai Mecha Godzilla.I'm not sure if they are in scale with each other. Probably not.

Both figures needed to have their arms out to maintain their balance. While I like the design and finish of the figures, I can't believe they retail for $60, even at $17, they seem pricey, but in all fairness, they are made by a small company in limited numbers so they need to recoup costs and make a profit. The sculpts are beautiful and it's a nice quality figure. If you like em, get em while they're cheap online at that big toy store. I don't know how many these silver versions are limited to, but the normal versions of these two are limited to 250.

To end this review off, I wanted to show you guys the header card it comes with. Interesting, no?

Wednesday, September 7, 2011

New Reviews: TFC Hercules Exgraver & Bandai Saint Cloth Myth Black Phoenix

I got 2 new reviews coming up of the following two figures:


  • Bandai's Saint Cloth Myth Black Phoenix which turned out to be a really nice release. I would really hate to become a SCM collector, but some of these figures are to die for. Not literally of course because how then would you enjoy them? Video Below.

Project Rodimus Update: Detailing cockpit

I got around to starting the cockpit detailing. I have a long ways to go, I have to touch up some parts, clean up others until I get it just right. I think it's coming out pretty good so far. Let me know what you guys think.
A little bit of touching up and some panel lining should do the trick.

I couldn't find a clear shot of Rodimus' interior but I did see that he has brown seats.
Stay tuned for more, cleaning up interior and redoing flames!

Tuesday, September 6, 2011

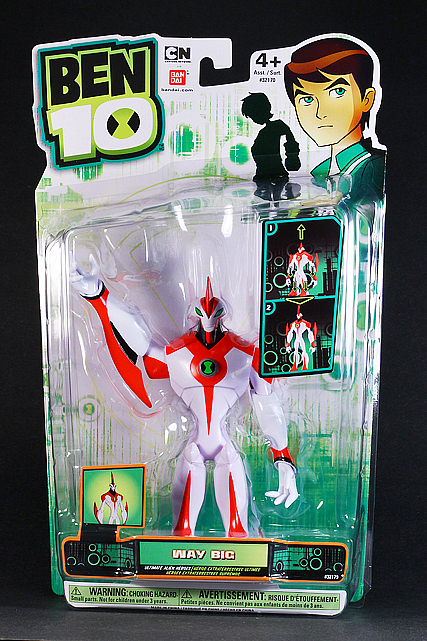
Bandai Ben 10 Way Big figure

I was at Walmart and grabbed a 4" Lion-O and a Wilykat. Then I saw this Way Big figure. I already have a 4" Lion-O and Wilykat is sure to be a peg warmer in no time, so I dropped those and got Way Big. He just looked so cool in an Ultramanish way. I was also going to grab a NRG figure because he has a light up gimmick, but I'll put that on hold for now. Here is Way Big.

After taking him out, he wasn't what I expected. I don't really know what it is. Maybe I expected him to be more articulated or maybe I expected the growing gimmick to be don e differently. I almost was wanting the entire figure to be made of PVC. Instead, only his arms and ball-jointed hands are PVC. The rest is a hard shiny plastic.


When I looked at the back of the legs, they looked really weird. You can see where his thighs just fold against the back of the shins. His knees form the heels. I would much rather have him be all PVC with pull out legs.


To make him big, you pull the head and fin out, pull the forearms out and unfold the legs. The legs sort of snap in the extended position but aren't what I call sturdy.


In the tall form, you see the mess left over from the legs. OK, I know I love Transformers and they sometimes have hollow legs, but they are transforming from a vehicle into a robot.


Here is a side by side comparison to show the height difference. It is a good deal taller.

Overall it is a great looking figure from the front, but that's it. The only articulated parts are the shoulders and hands. That's it. The leg gimmick isn't solid, I can imagine this thing becoming a floppy mess after a couple of "growths" because the legs do not lock securely. Granted it is designed for kids who only pay attention to their toys for a matter of minutes and move on, but those five minutes are filled with a overly complicated floppy gimmick. Pull out legs done in the same way the arms were done would have been better, but it may have affected the sculpt. This figure is "meh" from the waist down. Now for us collectors, this thing does have nice shelf presence, it is a bright white, has a nice sculpt and looks darn good. Look to spend around $11-$15 for this figure.

Monday, September 5, 2011

Project Rodimus: Coming along great!

The last few nights have been filled with paint, blood, tears, sweat, sanding polishing buffing, resanding, polishing and buffing. Oh buffing...especially today. My fingers are aching from buffing this paint to a glorious shine. I never got good paint jobs on my model kits up until recently when I decided to paint my stuff like I would a real car. That means, sanding then primering, the base coating, then clear coating x4, then wet-sanding, then clearcoating, then wet-sanding and finally laborous polishing to achieve a nice shine.

Here is a before and after picture of the exact Rodimus I painted.


Well, I guess it paid off because Rodimus is looking darn good. It is REALLY difficult to keep pieces from touching each other and scuffing, but the clear-coat really does a good job at keeping nicks to a minimum. Transformation, while not impossible, would require patience to avoid scuffing the finish. Since I have plans on selling this bad boy, I won't attempt it. I am just happy at the way it came out and would like to experiment a little more on my next Project Rodimus.
Front of Rodimus.

Rear of Rodimus showing the gold flaked wing. Notice the gloss on the lower legs..yeah that's tons of buffing!

I wasn't sure how he would look with a chromed face, but I took a chance. That's the only way to find out!

I didn't want to leave the leg panels red, so I painted them Charcoal Gray. It has a beautiful metallic flake to it.
At the last second I decided the legs should be glossy to match the rest of the figure. It looked a little of with just colored plastic.
Oh yes, his Rodimus Prime face-swap gimmick still intact!
Again, I used a chrome finish for his Rodimus Prime face.
He still has his teeny Matrix which I will be applying a chrome finish to. The gold outer casing on the Matrix will be painted the same gold color as his wing.

Oh, my bad! Did I forget to mention he now has an LED Gimmick? Oh yeah. The best part is that his Matrix is still removeable. I was proud of this one. It works off a button battery with a micro switch which is conveniently located in the drivers compartment. Unfortunately, to transform him, you would have to remove the gimmick. Hey I'm only human.

I am SOOO happy that I was able to integrate an LED Matrix into this figure. The design does not allow much space to include the power-source, so I had to use a THIN button battery, a micro-switch that I lost about 10 times while putting it together, and the thinnest wire you have ever seen...literally one strand. Again, transformation is possible, but alas, the LED feature has to be removed to accomplish transformation because of the wires.

Overall, it is coming out great. I still have a couple of details here and there to finish so check here for updates. In the next few days I will also be detailing the drivers compartment. I almost don't want to sell it.

Oh and here he is next to Takara's version.