Hello there, I'm back with a model kit. I am notorious for getting the itch to build a model kit and then lose interest in it. Problem is, I don't have the patience to paint and wait paint and wait and wait and wait. Well over the years I picked up some experience painting cars, mostly recently painting my race car. I painted it outside my house. Yes outside. How? I used lacquer paint which dries in minutes. If it works well on real cars it must be good on small ones too. So I decided to start using lacquer paints on my kits. I messed up a couple of kits finding a good paint. I've now found my favorite. It's Rustoleum Auto paint. Excellent fast drying stuff. Super glossy. I picked up primer, White and Clear coat. Anyways, on with the kit.
DAY 1:
So now we move onto the fun part. Painting the body. I like to do this first since this is what you wanna make sure comes out looking good. Because no matter how good it is inside and underneath, it's sh!# unless the outside looks good.
First step was to scuff the plastic body with 400 grit paper under running water. Sand down any unwanted mold lines. This kit has a few running down the fenders. Air dry the body. Then carefully attach the body onto a piece of cardboard so that you can lay it down and pick it up without touching the body. Mist it with primer in a quick sweeping motion making sure you start spraying before you sweep by and let go after you sweep over the body. You never want to start or end your spray over the body.
You'll notice that the finish of the body looks a tad rough. This is ok, the light mist of the primer dries so quick that some lands on the body almost dry causing a dusted look. Take a look and see if there are any imperfections that need to be sanded down. Primer is great for pulling imperfections out into view.
I had not sanded down a mold line enough so I took some sandpaper to it. Again under running water to get a clean sand. Repeat the primer process. If you are happy with the results, you can now grab a real fine sandpaper (I used 2000 but you could use slightly coarser) This is to level off the finish of the primer to get a smooth base coat. You may even want to pass an hobby knife (carefully) or toothpick through the panel lines if they are getting clogged with paint.
DAY 2: Now you can attach your primered and prepped body back on the cardboard and spray a couple of coats of base color, then sand carefully with 2000 grit paper under running water to level off paint. Reapply a thicker coat being extra careful not to run it thick. You don't need too much since you are applying a clear coat afterwards. Just enough to hide the primer.
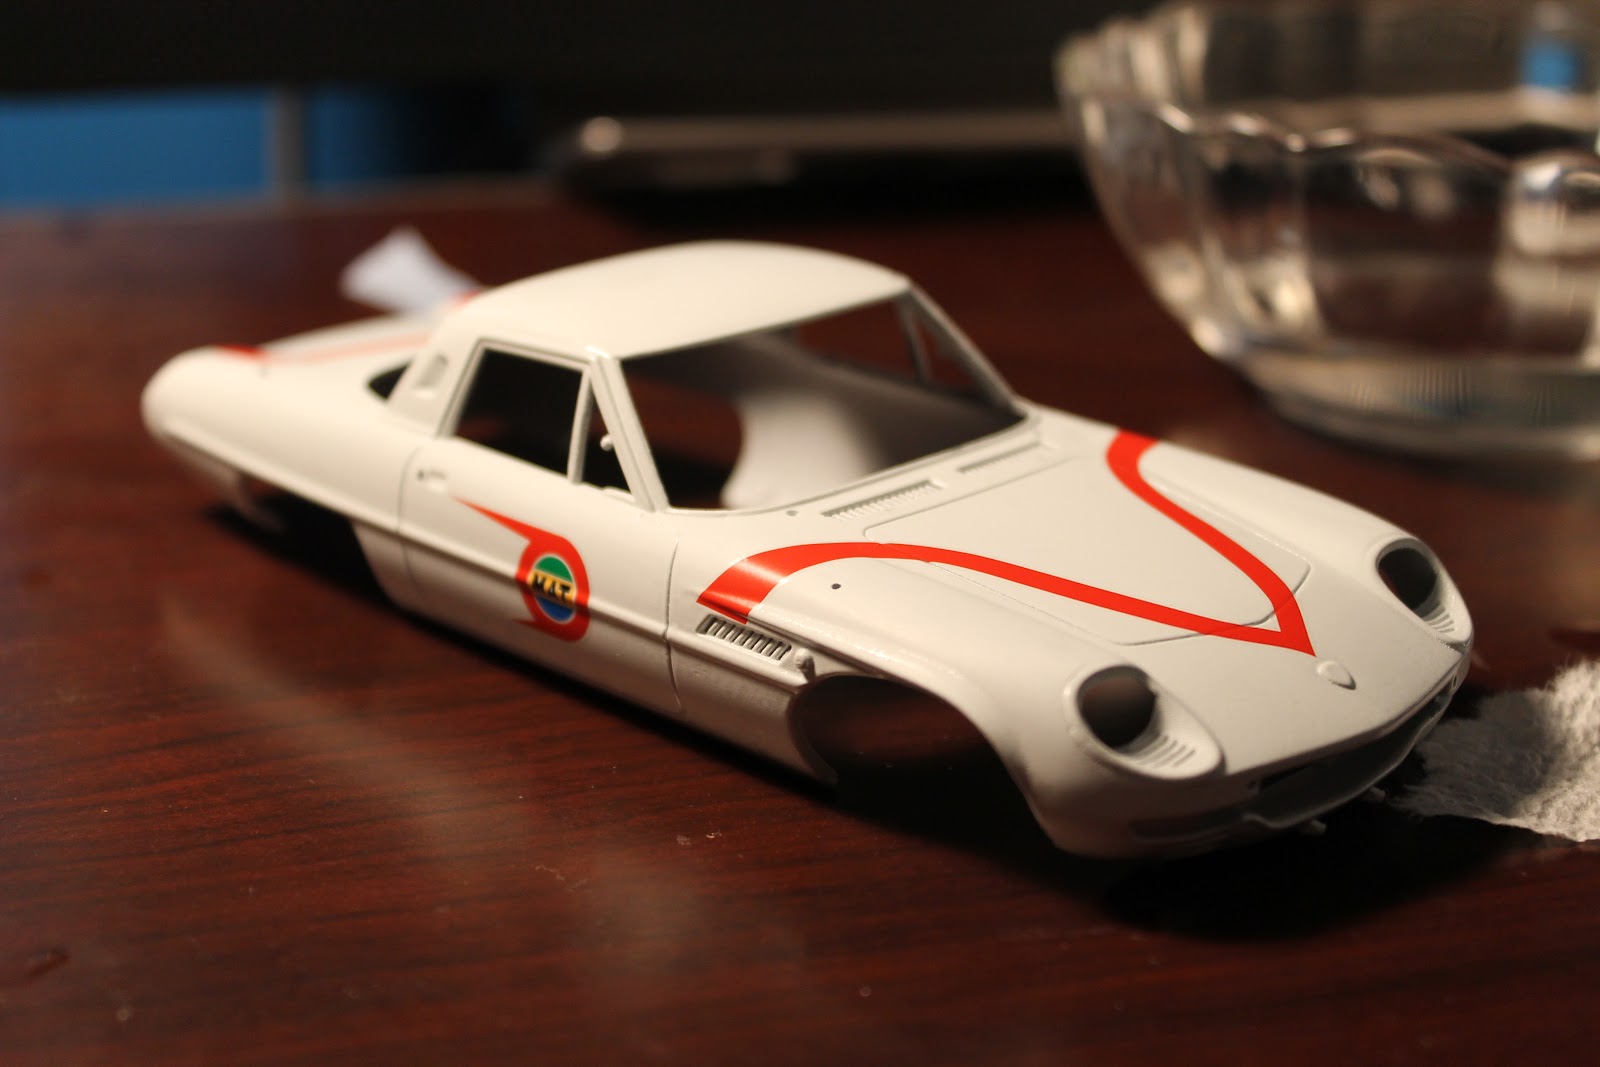
After applying the base coat, I sanded it down smooth with 2000 grit to get a smooth surface for the water transfer decal to stick to.
I started bt cutting out the piece that I wanted to put on first. I let it sit in water for about 40 seconds until it started to slide off the paper.
I then CAREFULLY applied it to the hood. These decals rip easily so be careful. To make it easier to line up, I wet the hood and used a wet cotton swab to move the decal around. Once in position I dabbed it with a dry cotton swab. Then I let it dry and continued on with the other decals.
At this point it's looking better but the paint looks dull and rough. Don't get discouraged though. This is normal. The clear coat will make things all better.
This is where things get scary. The kit comes with what I believe are photo-etched metal emblem decals. Amazingly small and detailed. You need to cut them out and peel off the backing. There is a clear film over them to allow you to see where you place them. Be darn careful. You only get one chance to put em on and most likely wont come off easily if you mess up. These things are wonderful otherwise because they are thick enough to give a raised look to them.
Oh yeah there's more of these. See the Mazda logo? Yeah that's one of those delicate metal decals. I tried a trick I learned putting stickers on my real race car. Wet the body and decal, place decal and slide into place then squeegee the air/water out. Since this decal is micro small, it was only necessary to wet a tad but a risky proposition as I had no clue how the adhesive would react. Well, luckily I got it centered in one shot. Patted it down and breathed a sigh of relief. I also had to add that MICROSCOPIC key lock above the Mazda logo.
Once I placed all the stickers on, I made sure there was no dust or hair on the body. It was time to seal the base coat and decals. I reattached the body to the cardboard and went downstairs and lightly misted the clear-coat on because I had painted the hood emblem using enamel and I didn't want the lacquer melting in and causing blue veins in the clear coat. once the mist coat dried, I laid the coats on thicker until I got a nice gloss. Be extra careful as you can get carried away trying to get a nice gloss coat. Don't go nuts because you can always wet-sand the clear coat and then use a polishing compound to achieve a wet look.
My efforts yielded a satisfying gloss, but as with anything that is painted, there is always a chance of dust landing and causing a bump or two. Also, Orange peel looks out of scale in a 1:24 scale car. Wet sanding should smooth down the clear coat. Wet sanding the clear coat should be done carefully, you don't want to sand through it and hit the white paint or worse....the decals. Thus you want a decent layer of clear coat that is thick enough to wet-sand and thin enough to not clog up your panel lines.
Did anyone find it weird that for someone who is such a big Voltron fan, I had not done a review on this figure? This is a SDCC Exclusive but as with all exclusives, there are always ways to get them. I've had this for a little while now so I should get around to doing something with it soon. I seemed to have misplaced it somehow. Don't ask. Stay tuned. Get your non SDCC Exclusive on mattycollector.com
Most people are tired of seeing this guy. I mean he's like more than 30 years old and there is a zillion reviews and pictures of this guy. So here is a zillion and one, except it's not a review, just a quick glance at it. MAYBE just MAYBE I will do a video of it, but I doubt it. Sorry
Front of the box.
Tray and Instructions/sticker pack. Points for the use of Styrofoam. Ziplock bag for the accessories not so nice.
Cab and trailer mode.
Robot mode. Not as cool as what you see on screen, but a classic figure. Chrome is really nice on this figure.
The quality seems OK, I had a nice time trying to get one of his legs to fold down, but it finally did and doesn't seem to seize up anymore. I was never into the trailer opening up so it's stowed away in the box. This figure is nice enough to look good displayed with my other Transformers so I say it was a worthwhile purchase. Even displaying in the box is cool. Chrome is nice, plastic seems to be of good quality. Doesn't scream KO like some others. Now I just need some quality stickers. Not a fan of KO stickers. Stay tuned for more, I have other KO's in my collection
I was out shopping for some baby formula on Tuesday when I got an email from JoshB of CDX. He was pretty surprised I had gotten Godsigma so quick and asked if I would like to do the review while the figure is still fresh as no one was getting one in the near future. Of course I said yes. First, I'm always down to review a robot, second, Josh is a real great guy in and out of CDX and I am always willing to help him out in any way I can. This is right after I had already done a quick review, a 2 part review on my channel AND a quick blog review of the figure.
OK, so that very night I spent HOURS, straight into the morning until 6am, then sleeping til 11am and continuing until about midnight when I posted it up. It was a mixture of photographing the GX-60, swapping lenses, seeing what worked best at getting the shots I needed to make it look good, shooting, reshooting, take after take after take. I mean, I wanted to finish this before too many reviews were out there...in other words, while it's still hot. So that meant working hard at completing the review. The problem is, how do I get such a big review done, pictures snapped, video recorded, edited and still have a quality review? Well, the answer is not so easy, but something had to give.
I started editing the video first since the video is the most labor intensive. I had to correct the video because it was too dark, then edit out some of my "umms" and "uhhs". Sometimes you get to one part of the video and realize you forgot to shoot something, That requires backtracking. Then it requires you to go back to what you edited and try and squeeze it in there without losing continuity. It also requires shifting all the perfectly timed sound effects to match up again, and somehow, something always goes unnoticed until you wait 6 hours to render, then you notice the mistake. So the editing program has a clever way to group sections so that they all move together...AWESOME. Except mine gets glitchy and does whatever it wants. I realized I started my review without showing the box! WTH? So by this time, Godsigma was long packed away so I pulled out some half-ass pictures I had taken previously and recorded some blind dialogue (meaning I was talking without seeing what I'm talking about) over it. So when I went to insert it at the beginning, the carefully grouped sections would not move together, if I tried to insert it into the beginning it would DELETE part of the video. Really really strange. So I stuck it as a bonus at the end of the video. Very uncool.
Sadly enough for me, when I sat down to look at the photographs, I realized I had the ISO set to auto on my camera which meant that the camera chose the highest possible ISO of 6400. If you've ever tried shooting something in low light, you will know that you get noise or "fuzzy dots" all over the picture. This is because the camera is compensating for the low light by raising the ISO, so instead of the shutter staying open longer to allow the proper light for correct exposure, it did what it was set to do which is shoot quick with low light. The result was about 40 BAD photos. So what did that mean? I could either re-shoot the figure, or work with what I have. I decided to do the latter. I had to Photoshop the noise out of the photos, sharpen them and basically make them worthy of using in this important review. So after hours of editing I ended up with "OK" pictures. Sure, many readers liked them, but I felt it could have been better. That's only the half of it.
In the end, I was able to get it up in record time while the buzz surrounding the figure is still strong. I got some good feedback but some people felt I should know more about the character if I am going to review it. I could write a whole blog explaining why I do what I do but in short, I don't watch anime, don't care much for it as an adult. There are two ways to look at a review. You are looking to get info on the toy for what it is...a toy, or you like the character so much that it brought you to look at the review. My style of review is covering the toy as a toy, not a place to get anime info. Sure, I'll include some tidbits form Wikipedia or whatever, but I'm not going to insert 10 paragraphs of how the character came to be and how in episode 32, he sort of died and was brought back by an alien witch doctor with a pegleg. There's anime reviews for that.
Then you got your hardcore fans that get offended. I've had some really pissed off Mazinger/Energer fans threaten me in different languages cause I pronounced Energer Z's name wrong. Listen I am a HUGE HUGE HUGE fan of Voltron but I would never ever get pissed off or put down someone's TOY review of a Voltron if let's say they said something like " I'm here to review this colorful robot that separates into 5 tigers or cats" "I already know they aren't tigers, but I would like to check out the toy anyway. I will admit though I can see how that can throw the feel off on the review.
In the end, the comments good and bad help to make my future reviews stronger more enjoyable to a wider variety of people. Just 'cause I don't know the protagonist's favorite sushi roll or if I call his weapon a "shooty thingy" instead of a "G-energy Juohken Beam Ray Blast Cannon" doesn't mean I don't put love into my reviews. Enjoy them for what they are, reviews about the toy and whether or not you wanna spend your hard earned money on them. And if you read this far, you need your head checked :P
Bandai is just hitting home runs lately when it comes to the Soul of Chogokin line. They used to make small 7" Chogokins of our favorite characters and lately, they've been making some huge combiners. This thing is massive. Lets take a look from the moment I received it to gattai.
This is what I was hoping to see! Vintage style packaging. I love it.
They are all laid out nicely in the Styrofoam.
There is also a tray for the accessories.
You have to love chain weapons.
Kuuraiou- Notice how on each robot, there is individual arm baggies to keep it from scratching in transit.
Here are the fist sections. The fists fold in and become a nice rectangular box which fits snugly into the main robot's feet.
Here is what it looks like inside the foot.
Here is the rear view of the fist placement on one of the feet and one without for comparison.
Rikushin'ou
Kaimeiou
Here you can see how they all stack up against each other.
TIME TO COMBINE!!
Getting this one to gattai mode requires pulling out arms and folding up legs into waist.
A concern of many was the possibility of scratching on the silver leg part here as seen in the prototypes. There is no need for concern as long as the legs are lined up right. There is very minimal clearance but there should be no cause for concern if you are careful.
Again, with the leg robots, there is concern with paint scratching. As long as everything is lined up carefully, there in no need for concern. Bandai knows what they are doing. I did however remove the head and fists since they will not be seen in robot mode. I'm a little paranoid in getting them scratched when combined. The only downside in removing the heads of the leg robots is that the antenna doesn't stick out of GODSIGMA's thighs when combined.
This piece forms the chest and wings of Godsigma
Once you unfold this, you are ready to place on the main robot. The black bracket that unfolds is diecast. The rest is plastic.
There are panels that fold up around the head of the leg robots. These panels wedge into the inner thighs of the main robot. It seemed a bit weird to me at first...somewhat fragile, but they are solid and go in with a satisfying snap.
The belt section that unfolds from the wing set is a bit tricky to get on lined up and can cause scratching if not careful. Take your time to line everything up so that it snaps into the waist snugly.
Here is the completed robot. It is simply wonderful.
You'll notice back here that I chose to keep the dangling feet off the back. I'm so happy Bandai gives us that option.
Here is how he stacks up against other Chogokin. From the small Xabungle to the big guys- Daltanious, Godmars and Iron Gear.
Overall a great menacing-looking figure when displayed. Quite hefty and very detailed. Spectacular execution and transformation engineering. One of the neatest and precise combinations I've experienced in a while. I love how everything just snaps into place without making you cringe. What's it cost? About $300 shipped. Ouch